Valentines Day HTML/CSS/JS
Happy Wednesday!
Did you all have a nice Valentines Day? I hope you were all able to share love, with yourself or with another. ❤️
Let's begin
Firstly, we need a webpage. Nothing fancy, I went for a white background. I mainly wanted here to just focus on the box that the quote would fit in. This is what we're aiming for:
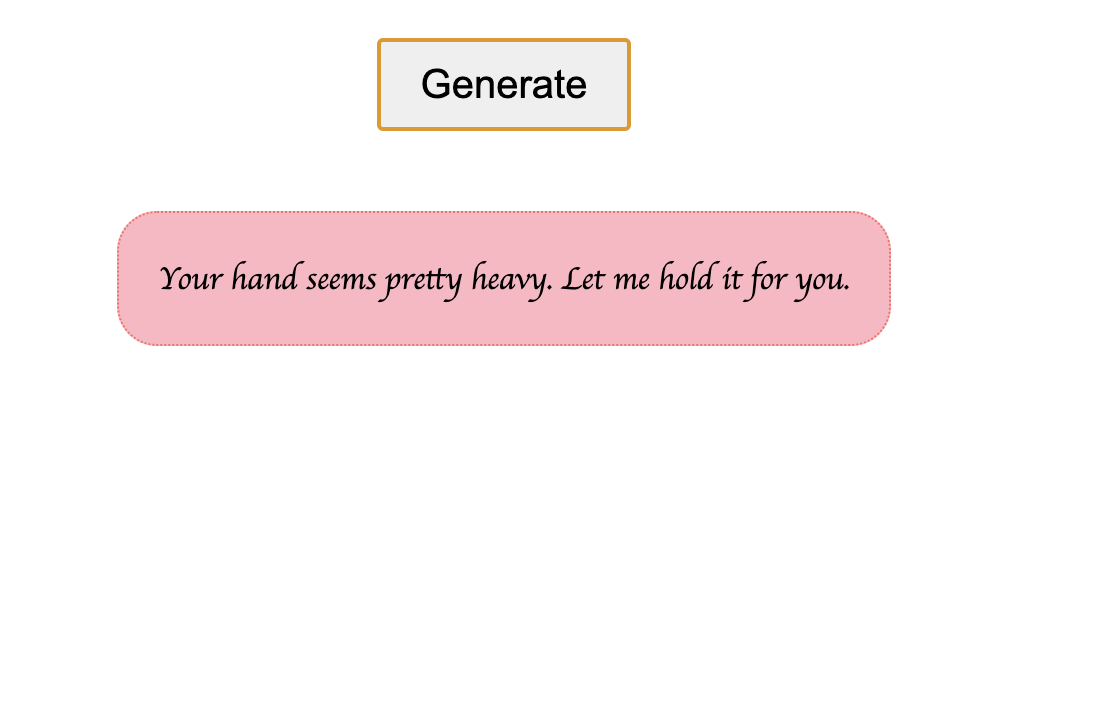
A button, a pastel pink box with a red dotted border (you need to look closely to see the dots!) that contains a pickup line. A little cheesy maybe? But totally fun!
The HTML
Let's build our webpage first, as I feel that will be the easiest part.
A pretty basic template to start, I'd say this is a standard webpage layout for HTML. I'll explain the important lines here.
/<!DOCTYPE html>
<html>
    <head>
        <meta charset="utf-8">
        <meta http-equiv="X-UA-Compatible" content="IE=edge">
        <title>Pickup Lines</title>

        <meta name="description" content="">
        <meta name="viewport" content="width=device-width, initial-scale=1">
        <!-- Below is how we link our CSS Stylesheet in -->
        <link rel="stylesheet" href="style.css">
    </head>
    <body>
        <div id="container">
            <button id="generate-button">Generate</button>
            <div id="quote-display"></div>
        </div>
        <!-- Our Javascript file -->
        <script src="script.js"></script>
    </body>
</html>
Let's focus on our <body> tags.
We have:
A container to hold everything in:
id="container"A button to generate our pickup line:
id="generate-button"An element to contain our pickup line:
id="quote-display"
With all of that in, and nothing else, we have this:

Pretty boring. But its what we need to get started. Let's get that button to actually do something.
The Javascript
I created a file called script.js which is where our Javascript functionality will be stored and is the brains of what we will create today.
Here is the complete code:
var generateButton = document.getElementById("generate-button");
var quoteDisplay = document.getElementById("quote-display");

generateButton.addEventListener("click", function() {
// Create a new XHR object
    var xhr = new XMLHttpRequest();

    // Open a GET request to the URL of the JSON file
    xhr.open("GET", "/pickup_lines.json", true);

    // Send the request
    xhr.send();

    // Wait for the response to arrive
    xhr.onreadystatechange = function() {
        if (xhr.readyState === XMLHttpRequest.DONE) {
        // Parse the response into a JavaScript object
            var data = JSON.parse(xhr.responseText);

            // Pick a random item from the array
            var randomIndex = Math.floor(Math.random() * data.length);
            var randomItem = data[randomIndex];

            quoteDisplay.innerHTML = randomItem;

        }
    };
});
First, we create two variables to hold the information for our button, and where our quote will go:
var generateButton = document.getElementById("generate-button");
var quoteDisplay = document.getElementById("quote-display");
This is a simple case of using getElementById to grab the elements with those ids. If you look back up at the HTML code, you will see that I put those ids in there, so my JS knows where to look.
Next, we need to make our button actually do something. For this, we add whats called an eventListener to it, so it can react to us pushing the button.
generateButton.addEventListener("click", function() {
This 'click' will tell JS we are wanting to react to when we Left-Click the button.
Next, we need to get our pickup lines from somewhere. In this case, I have downloaded 50 from online in a JSON file. A JSON file is essentially just a file formatted so that scripts such as Javascript but many others too, can get hold of this information.
I am using a function within JS called XMLHttpRequest to get our JSON file, using the code below:
var xhr = new XMLHttpRequest();
// Open a GET request to the URL of the JSON file
xhr.open("GET", "/pickup_lines.json", true);
// Send the request
xhr.send();
We create our request in a variable called xhr, use the GET method of XMLHttpRequest to grab the JSON file, and then our send function tells XMLHttpRequest to process the file.
Now we need to process that data, which we do as follows:
// Wait for the response to arrive
    xhr.onreadystatechange = function() {
        if (xhr.readyState === XMLHttpRequest.DONE) {
        // Parse the response into a JavaScript object
            var data = JSON.parse(xhr.responseText);
We wait for the data to be returned using
onreadystatechangeMake sure that it's done with
xhr.readyState === XMLHttpRequest.DONEUse
JSON.parseto process that JSON file into a data object we can use within JS
That data object will contain an array, or a list, of all 50 pickup lines. Now all we need is a random one. That way, each time someone clicks Generate, the Event Listener will process the JSON and grab a new pickup line. This is how the data is placed into our <div> element from earlier:
// Pick a random item from the array
var randomIndex = Math.floor(Math.random() * data.length);
var randomItem = data[randomIndex];
quoteDisplay.innerHTML = randomItem;
The first line grabs a random number, by using a random number picked between 0 and the
data length, or the length of our list (our 50 items). We useMath.floorbecause the number that's produced would be a floating point, or number with decimals in, and we just want the integer value.We use
data[randomIndex]to select that random item within our listquoteDisplayis our element where our pickup line will be placed, from the<div>earlier. We use theinnerHTMLmethod to change the text inside that element, in this case, to our pickup line
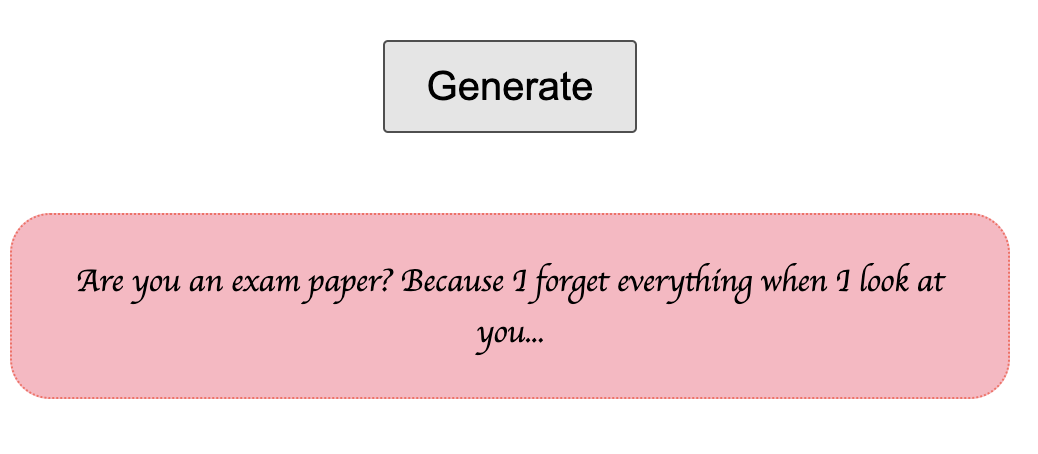
And that's our code complete! Every time our user clicks Generate, the code will run again, looking for a new pickup line. Now, when we click the button, our page will look like this, including our new line:

This is okay, but it's not pretty, is it. Let's make it look nicer. From earlier, I wanted our button to look better as well as having our quote inside a nice box, and let's change the font while we're at it. For this, we need to use our style.css
The Stylesheet
Create a file called style.css and enter the following code:
#container {
  width: 500px;
  text-align: center;
}

#generate-button {
display: block;
margin: 20px auto;
font-size: 20px;
padding: 10px 20px;
}

#quote-display {
  text-align: center;
  margin: 20px auto;
  font-size: 16px;
  font-family: cursive;
  background-color: #ffb6c1;
  border: 1px dotted #ff6961;
  border-radius: 20px;
  padding: 20px;
  display: inline-block;
  width: auto;
}
Let's describe each of these.
The # before each one, means that we are referring to an id of the element. This can be a button, paragraph, div, most things can have an id. It is how our Javascript and our CSS can refer to those items, and style or interact with them.
#container: This is our overall container for everything, so that it is all neat. Simple, just 500px and centre aligned.
#generate-button: block displayed, meaning it takes up the entire width of the container, in this case. A 20 pixel margin all round, 20 pixel font and a bit of padding, or space around it.
#quote-display: Center aligned text, 16 pixel font which is cursive, or fancy-italic, a nice pastel background indicated by RGB code #ffb6c1, a 1 pixel dotted red border RGB code #ff6961, a bit of padding and some properties to make it fit within the container nicely again.
The finished product!
And that's it! With all of that in, clicking the button now should give you something that looks like this!
In summary...
I hope you all enjoyed this! I had a lot of fun learning how to create this, and learnt a lot about XML HTTP requests and a little about CSS along the way.
If you have any questions, comment below please, share your versions of what you created, have a play around with the CSS to style it how you like!
I appreciate you all so very much for taking the time to read this and see you in the next one! ❤️
