

What is an Arduino?
The Arduino Uno is a microcontroller board based on the ATmega328P. It has 14 digital input/output pins, 6 analog inputs, a 16 MHz quartz crystal, a USB connection, and a power jack. The Arduino Uno can be programmed using the Arduino Integrated Development Environment (IDE) and is compatible with a variety of programming languages, including C++ and Python. It is widely used for a range of projects, from controlling lights and motors to collecting data and communicating with other devices. It's tiny and it enables you to be able to create simple electronics projects that can be created with code!
As for my project...
I decided to create a Password Generator using the Arduino. What would my requirements be?
Sites that require secure passwords can ask for really difficult options sometimes, so I decided I wanted the following criteria:
At least one upper-case letter
At least one number
At least one special character out of $%^@&*!?
The rest to be lowercase letters
Breaking this down into smaller tasks
What do I need to do then?
Generate a string in code that will meet our requirements
Create this code in Arduino IDE which is the IDE for this board
Create the circuit for this using a Breadboard, an Arduino and an LCD screen
Creating the String in code
So, after some research, I came up with the following code, which we will break down:
#include <Wire.h>
#include <LiquidCrystal_I2C.h>

const int buttonPin = 2; // The button is connected to digital pin 2
LiquidCrystal_I2C lcd(0x27, 16, 2); // Creates an instance of the LiquidCrystal_I2C library

void setup() {
  Serial.begin(9600);
  randomSeed(millis());
  pinMode(buttonPin, INPUT_PULLUP);
  lcd.begin();
  lcd.backlight();
}

void loop() {
  if (digitalRead(buttonPin) == LOW) { // Button is pushed
    String randomString = generateRandomString();
    Serial.println(randomString);
    lcd.clear();
    lcd.setCursor(0, 0);
    lcd.print(randomString);
  }
  delay(10);
}

String generateRandomString() {
  const char specialChars[] = "!@#$%^&*";
  const char letters[] = "abcdefghijklmnopqrstuvwxyzABCDEFGHIJKLMNOPQRSTUVWXYZ";
  String randomString = "";

  // Generate a random special character
  randomString += specialChars[random(0, 7)];

  // Generate a random capital letter
  randomString += letters[random(26, 51)];

  // Generate 6 random lowercase letters
  for (int i = 0; i < 6; i++) {
    randomString += letters[random(0, 51)];
  }

  return randomString;
}
That's a lot! Let's break that down.
#include <LiquidCrystal_I2C.h>

#include "Adafruit_LEDBackpack.h"
#include <Wire.h>
#include basically tells us which libraries we want our code to use. Think of it like the 'import' ability of Python.
const int buttonPin = 2; // The button is connected to digital pin 2
LiquidCrystal_I2C lcd(0x27, 16, 2); // Creates an instance of the LiquidCrystal_I2C library
We create an integer for our buttonPin. I wanted to use a button that I could push to generate a new password. We will use this buttonPin integer later!
I then use the LiquidCrystal_I2C library to create an lcd object that we can refer to later.
What is I2C? Think of it as the way we communicate to the LCD - it uses a simple serial data line that is clocked by a separate line, to communicate data efficiently without needing a bunch of wires.
void setup() {
  Serial.begin(9600);
  randomSeed(millis());
  pinMode(buttonPin, INPUT_PULLUP);
  lcd.begin();
  lcd.backlight();
}
This is Arduino-specific code. This tells our Arduino what to do on its first run, and it'll run this first, and only once.
Serial.begin(9600); - this tells our serial monitor (which is our way of monitoring what's happening on the Arduino, from the PC which connects to it), what data rate to use - in this case, it's 9,600 bits per second, which is a common data rate to use.
randomSeed(millis()); - this tells us to use the current millisecond to set the seed for our random number generator - this will ensure we always get different passwords each time.
pinMode(buttonPin, INPUT_PULLUP); - this tells our buttonPin to operate in PULLUP mode and that it should be an INPUT. In simple terms, INPUT_PULLUP makes it easier to work with buttons or other input devices by providing a default level for the digital pin when it is not connected to anything.
lcd.begin(); - Enable the LCD so we can use it later.
lcd.backlight(); - Turn on the backlight on the LCD.
void loop() {
  if (digitalRead(buttonPin) == LOW) { // Button is pushed
    String randomString = generateRandomString();
    Serial.println(randomString);
    lcd.clear();
    lcd.setCursor(0, 0);
    lcd.print(randomString);
  }
  delay(10);
}
This is the main running part of our code! the void loop() { } part of our code will run over and over until the Arduino is powered down! Now let's break this code down.
if (digitalRead(buttonPin) == LOW) { - if we read our buttonPin and it's LOW, i.e. the button is pushed, we want to run this code.
String randomString = generateRandomString(); - use the function generateRandomString() to create our randomString, or our password. I will show you this function shortly when it appears later in our code.
Serial.println(randomString); - print that password to the Serial interface that we set up earlier. You will see how this is seen on the PC, later in the article.
lcd.clear(); - Clear the LCD of the previous password - remember, every time we create a new password, we want to get rid of the old one.
lcd.setCursor(0, 0); - Set the cursor of the LCD to the top left, at 0, 0.
lcd.print(randomString); - Print the randomString to the LCD, at the cursor position we set.
delay(10); - we need this because when we push the button, it'll 'bounce' a little before the program realises it's down. If we didn't do this, it would generate passwords until it stopped bouncing! And we don't want this! This gives the Arduino a little break before it looks for the button push again.
Now for the fancy part of the code, the bit that produces the password!
String generateRandomString() {
  const char specialChars[] = "!@#$%^&*";
  const char letters[] = "abcdefghijklmnopqrstuvwxyzABCDEFGHIJKLMNOPQRSTUVWXYZ";
  String randomString = "";

  // Generate a random special character
  randomString += specialChars[random(0, 7)];

  // Generate a random capital letter
  randomString += letters[random(26, 51)];

  // Generate 6 random lowercase letters
  for (int i = 0; i < 6; i++) {
    randomString += letters[random(0, 51)];
  }

  return randomString;
}
const char specialChars[] = "!#$%^&*"; - create a character array that will hold our special characters.
const char letters[] = "abcdefghijklmnopqrstuvwxyzABDEFGHIJKLMNOPQRSTUVWXYZ"; - create a character array that will hold all our letters.
String randomString = ""; - create a random string that will eventually contain our password.
randomString += specialChars[random(0, 7)]; - add a special character at the start of our String.
randomString += letters[random(26, 51)]; - add a capital letter as our next character of the String.
for (int i = 0; i < 6; i++) {
    randomString += letters[random(0, 51)];
  }
For the next 6 characters, use any letter of the letters[] array.
return(randomString); - return the String we just created, from the function.
Onto the Arduino!
Okay, so we have our code, now time to actually put it to the test!
I used a website called TinkerCAD to put together the diagram for this - if you own an Arduino yourself, you can build it yourself using the diagram below!


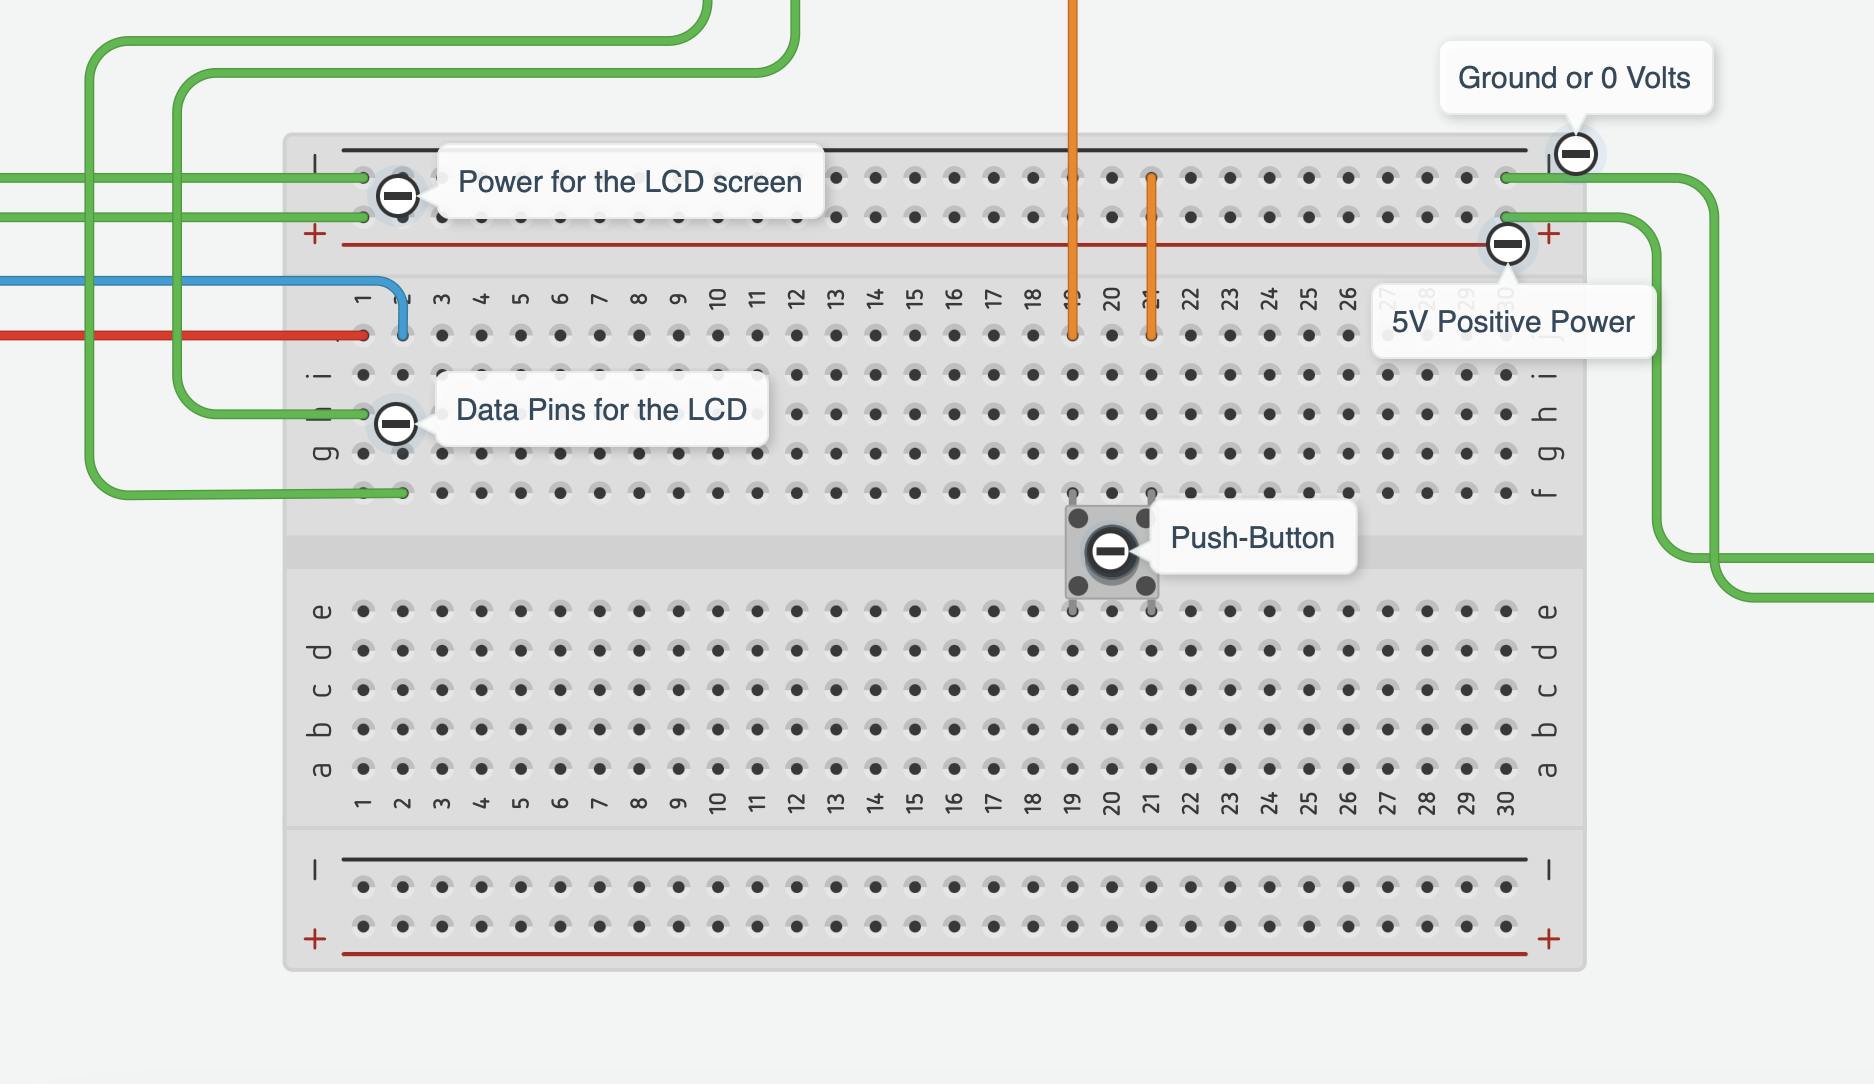


Pretty straightforward design and I'll give you the basics.
The LCD screen needs 5V and GND (0V) so we supply that from the Arduino board using the + and - lines of the breadboard.
The LCD screen data gets sent from the SCL and SDA pins (shown on the board diagram) and is sent to the breadboard and then onto the LCD screen from there.
The push-button on the breadboard is connected at one end to GND (0V) and at the other, to pin 2. Pin 2 has a PULLUP set on it as described earlier.
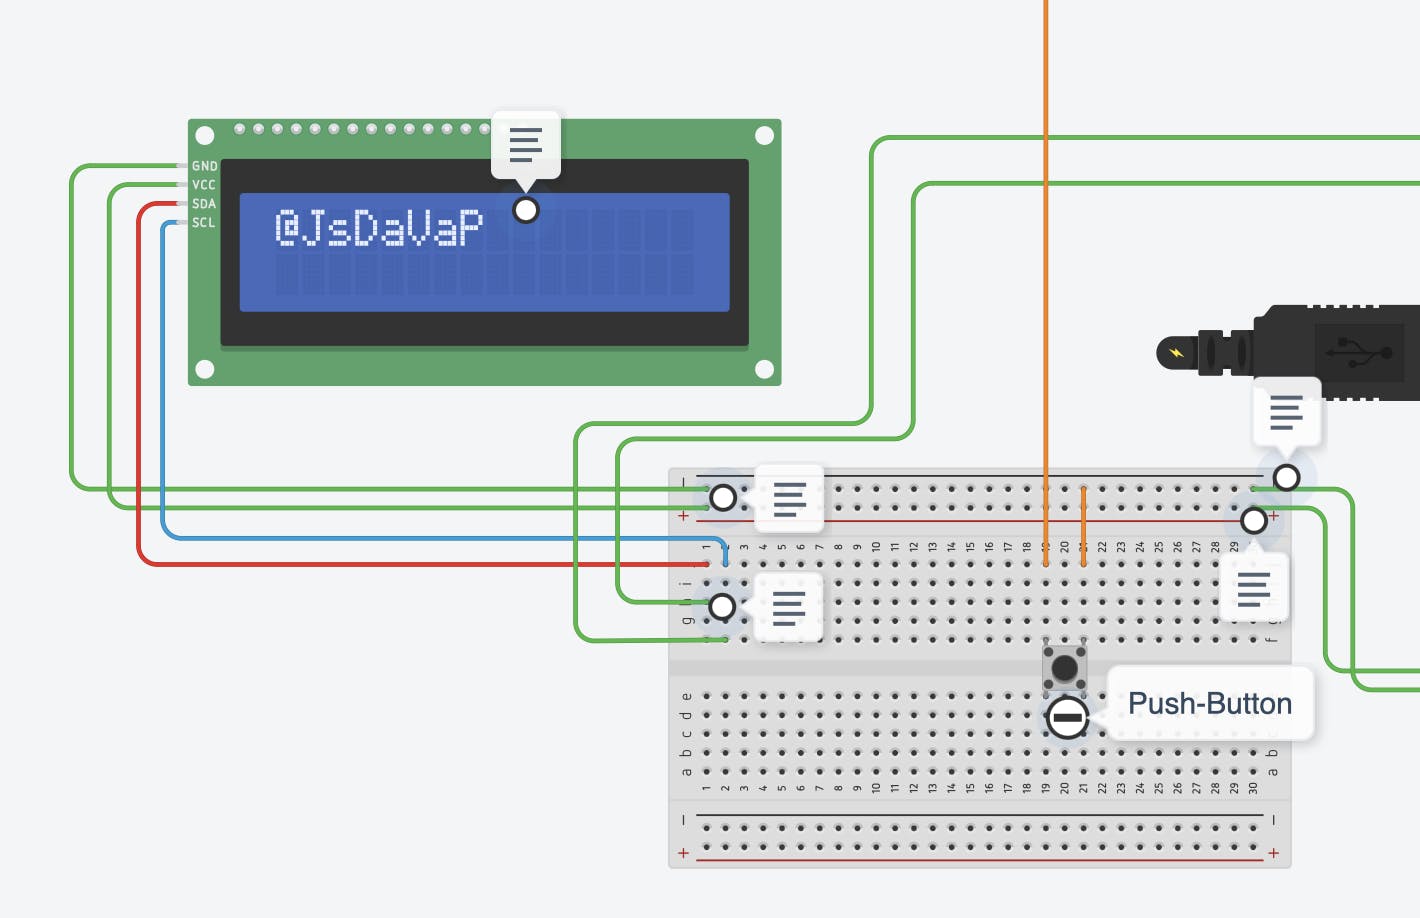
When you push the push button, the display comes up with the password:
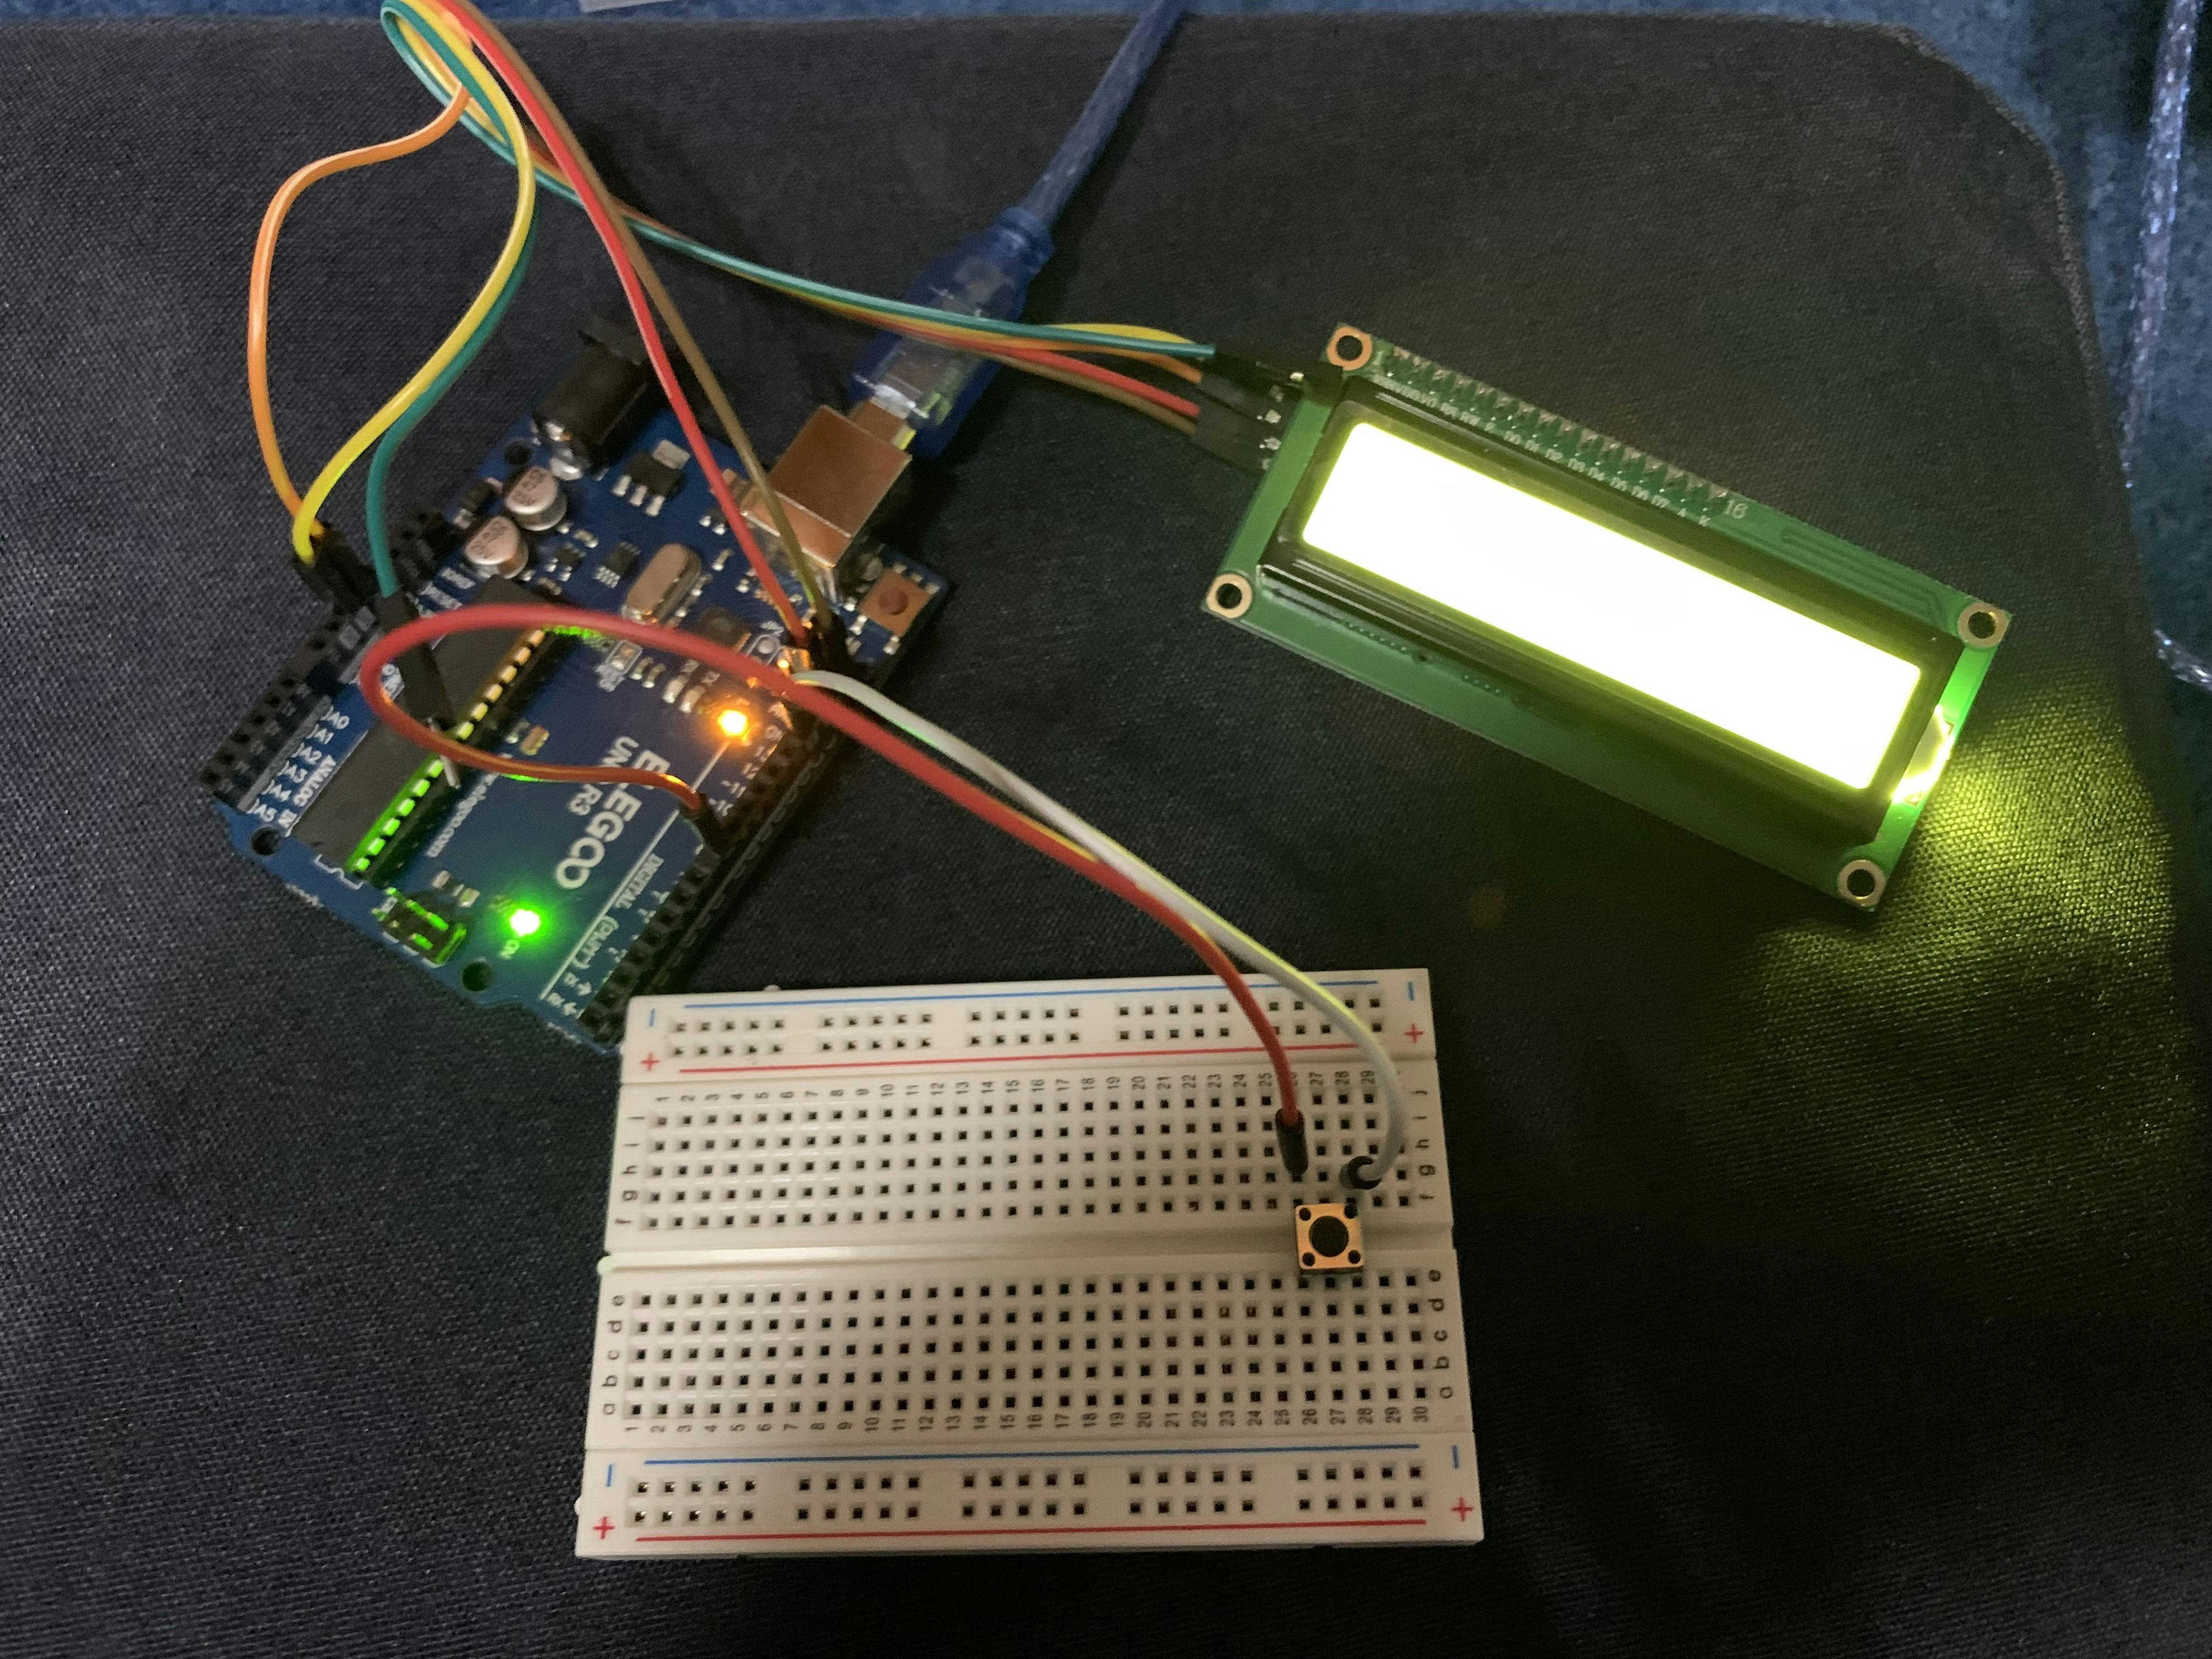
And, finally, after I built it on my own display and board, here is the result!

You'll notice on the board above that I connected the display directly to the board - this is another way to do it.
Summary!
I had such fun building this!
Today you learnt (and so did I!):
Arduino Code
How an Arduino Board works
How to put those 2 things together to create an Arduino password generator!
I hope you all had fun following along with me, and, maybe tried it yourself!
Challenge:
So, when I first built this, I had an issue where it would constantly generate a password regardless of what was done with the button. The circuit was built correctly but there happened to be an issue with the code. Can you find it?
Comment if you did!
#include <Wire.h>
#include <LiquidCrystal_I2C.h>

const int buttonPin = 2; // The button is connected to digital pin 2
LiquidCrystal_I2C lcd(0x27, 16, 2); // Creates an instance of the LiquidCrystal_I2C library

void setup() {
  Serial.begin(9600);
  randomSeed(millis());
  pinMode(buttonPin, INPUT_PULLUP);
  lcd.begin();
  lcd.backlight();
}

void loop() {
  if (digitalRead(buttonPin == LOW)) { // Button is pushed
    String randomString = generateRandomString();
    Serial.println(randomString);
    lcd.clear();
    lcd.setCursor(0, 0);
    lcd.print(randomString);
  }
  delay(10);
}

String generateRandomString() {
  const char specialChars[] = "!@#$%^&*";
  const char letters[] = "abcdefghijklmnopqrstuvwxyzABCDEFGHIJKLMNOPQRSTUVWXYZ";
  String randomString = "";

  // Generate a random special character
  randomString += specialChars[random(0, 7)];

  // Generate a random capital letter
  randomString += letters[random(26, 51)];

  // Generate 6 random lowercase letters
  for (int i = 0; i < 6; i++) {
    randomString += letters[random(0, 51)];
  }

  return randomString;
}
Thank you all so much for following along! ❤️